")
Introduction
In our daily work as Android developers, we are constantly performing repetitive tasks within app management, such as installing a new version of the application or uninstalling the old one, clearing the cache, copying data from the Android device to the development machine, and vice versa. Most of these tasks can be automated, which saves our time and reduces our frustration when it comes to manually handling the same actions over and over again. But first let's answer the question: how does our machine communicate with our Android device?
What is adb (Android Debug Bridge)?
Adb stands for "Android debug bridge," a command line tool that allows us to communicate with Android devices from our PCs. It brings many options, but here we will focus on the most interesting ones from a developer's perspective.
Adb consists of 3 main components:
- Client: sends a command to run on an Android device. The client is run on your development machine and it can be invoked with the adb command.
- Daemon: a background process which runs commands sent by the client on an Android device.
- Server: a background process that runs on the development machine; it manages communication between the client and the daemon.
Adb setup
Firstly, we need to set up adb before any further work. There are three options to use adb on your machine:
- If you have installed Android Studio on your machine, adb is built in already
- Download the standalone latest version of Android SDK platforms tools, which already includes adb (link)
- Using your package manager tool, which depends on your system, e.g.
brew install android-platform-toolson macOS
After installing, check the correctness by simply typing the command:
adbIn case your command is not recognized, I recommend adding an adb path to the environment variables to run adb commands from every place in your terminal.
After successful installation, the next step is to connect with your phone. Depending on your needs, you can connect your physical phone via USB or wifi or use AVD (Android Virtual Device) — here's a documentation section on managing avds.
When it comes to physical devices, there is one additional step before your further actions enable developer options on your device.
Now you're ready to go; to check the connection with your device, type the command:
adb devices
# or
adb devices -l (long output, specific information about your device, helpful if more devices are connected)
You should see your device on the list of attached devices.
On the first adb command run, there is additional information:
* daemon not running; starting now at tcp:5037
* daemon started successfully
List of devices attached
RZCT809FTQM     device
which informs us that the daemon process has successfully started on the connected device.
From now on, all client commands from your PC are listening on tcp port 5037, a constant default port for all adb clients.
In case of any problems with the connection, try to restart the whole server:
adb kill-server && adb start-serverIt's also a good option when Android Studio plays tricks on us and doesn't show your device on the available devices list or when the device loses connection and starts to blink.
To see all available options of adb, type:
adb helpFor the sake of clarity, all examples will assume a connection with one device while the developer is working on a UNIX based system. In case of multiple devices connected to your PC, you need to pass a unique identifier to specify on which device you want to proceed. For an Android device, the unique identifier is the serial number. To specify the device, use the -s option to pass the Android device serial number:
adb -s <serial_number>You can extract a serial number from the previously mentioned adb devices command.
Adb shell
Android is a system based on a Linux distribution that includes Linux kernel, and because of that we are able to access its shell layer. To do that, type the command:
adb shellYou should now access the shell layer; for a check, run the command:
whoamiYou can also run shell commands without accessing the shell layer first:
adb shell <command>For example:
adb shell ls /sdcardThis lists all catalogs and files within the /sdcard catalog, which typically represents the SD card that's been inserted to the device.
Accessing the shell allows you to proceed with the Android system in a similar manner to the UNIX-based system; all commands for managing files, such as ls, touch, cat, etc., will be available. Of course, on our physical devices, some operations are blocked without root access arising from Android security policies. The shell provides us with a range of interesting options, enabling us to:
- Manage application installation and uninstallation with android package manager
- Manage catalogs and files
- Run shell scripts on our phone
- Display and modify system settings
- Run and stop applications
- Screen capture
File transfer
One of the powerful features of adb is exchanging data between your phone and PC.
Copying data manually can be annoying, especially when we need to do it on a regular basis. Another negative factor is that GUI windows sometimes don't show recently created files, e.g. after screen recording, a new file is not always visible in the file explorer.
adb pull
Whenever you need to copy some data from your phone to PC, the adb pull command comes to the rescue. It takes two parameters:
adb pull <remote> <local>where:
- Remote (required): is the path on your mobile device to the file or directory that you want to download
- Local (optional): is the computer's local path where we want to save the downloaded file or directory; when the local path is not provided, the file will be downloaded to the current working directory on your computer
To see the progress of downloading a file, add the -p flag to the command.
For example, if we want to download a movie.mp4 file from our /sdcard catalog on our phone and save it on our PC desktop, we can simply type:
adb pull -p /sdcard/movie.mp4 ~/Desktopadb push
There is also a pattern where we need to push the data from our PC to the Android device.
For that purpose, we have the adb push command. It takes two required parameters:
adb push <local> <remote>where:
- Local: is the computer's local path where we have the file or directory that we want to send to the Android device
- Remote: is the path on your mobile device that you want to place in a file or directory
To see the progress of the file upload, add the -p flag to the command.
For example, let's say that we want to send the previously downloaded movie.mp4 back to our phone in the /sdcard catalog:
adb push -p ~/Desktop/movie.mp4 /sdcardScreen capture
Adb also provides options to take screenshots and screen recordings.
Screenshots are available in the screencap shell utility. After accessing the shell layer, type the following command:
screencap filenameThis command takes a screenshot and saves it in the Android directory.
For example:
screencap screen.pngWithout providing a catalog, it will try to save a screenshot in the Android current working directory, which is impossible, e.g. for system directories, and commands may throw a read-only permission error.
Another example with an explicit path:
screencap sdcard/screen.pngWith the file transfer knowledge, we are able to take a screenshot and copy data from an Android device to our PC in three simple commands, pretty neatly:
# Take screenshot and save it on sdcard
adb shell screencap sdcard/screen.png

# Download screenshot from our phone to the current working directory in our PC
adb pull sdcard/screen.png

# Optionally remove screenshot from phone
rm sdcard/screen.png
Screen recording is also possible via adb, but in this case, it has its limitations:
- Max duration of the recording is 3 minutes
- Audio is not recording during a video
- Screen rotation is not supported
It uses the screenrecord utility:
adb shell screenrecord [options] pathTo see all available options for the screenrecord utility, type:
adb shell screenrecord --helpExample usage:
adb shell screenrecord /sdcard/movie.mp4saves a recorded movie.mp4 in the sdcard directory.
Dumpsys
Another great tool that is accessible through the adb utility is dumpsys. It's a tool run on an Android device that shows information about system services.
The basic command for displaying information for all services is:
adb shell dumpsysThe default output provided by dumpsys is often excessively detailed, making it necessary to employ specific command-line options in order to obtain output solely for the desired system services.
For listing all available system services, type:
adb shell dumpsys lsThere are a lot of services running on Android devices, so I will focus on more interesting ones from a developer's perspective.
Each service has its own options; to see available options for a given service, use the command:
adb shell dumpsys <name of service> -hFor example:
adb shell dumpsys battery -hprints all possible options for a battery service:
Battery service (battery) commands:
  help
    Print this help text.
  set [-f] [ac|usb|wireless|status|level|temp|present|invalid] <value>
    Force a battery property value, freezing battery state.
    -f: force a battery change broadcast be sent, prints new sequence.
  unplug [-f]
    Force battery unplugged, freezing battery state.
    -f: force a battery change broadcast be sent, prints new sequence.
  reset [-f]
    Unfreeze battery state, returning to current hardware values.
    -f: force a battery change broadcast be sent, prints new sequence.
Activity service
adb shell dumpsys activityActivity service is used to display details for activities within the device. The command version without any additional parameters returns basic information about all activities.
The most valuable option is to provide your application's package name to the activity service, which will print the currently run activity along with the whole view hierarchy and stack.
adb shell dumpsys activity <package name>The one disadvantage of directly using activity service is poor readability and the inclusion of unnecessary information in the output. That's why I recommend using the dump script from the AndroidViewClient library, which prints the view hierarchy in a much cleaner way and provides several options to parametrize it.
For displaying all available options for the dump script, type:
dump --helpSample output with the -x option, which also dumps views position:
android.widget.FrameLayout   (0, 0, 2560, 1498)
   android.widget.LinearLayout com.example.package:id/view_nav_header  (0, 51, 513, 102)
      android.widget.TextView com.example.package:id/txt_header All reports (68, 59, 445, 85)
   android.widget.TextView com.example.package:id/txt_no_reports_info No reports have been created (1062, 797, 436, 44)
There is also a script available for displaying the current Activity stack in human-readable format called easy-dumpsys for a specific app package:
easy-dumpsys <package>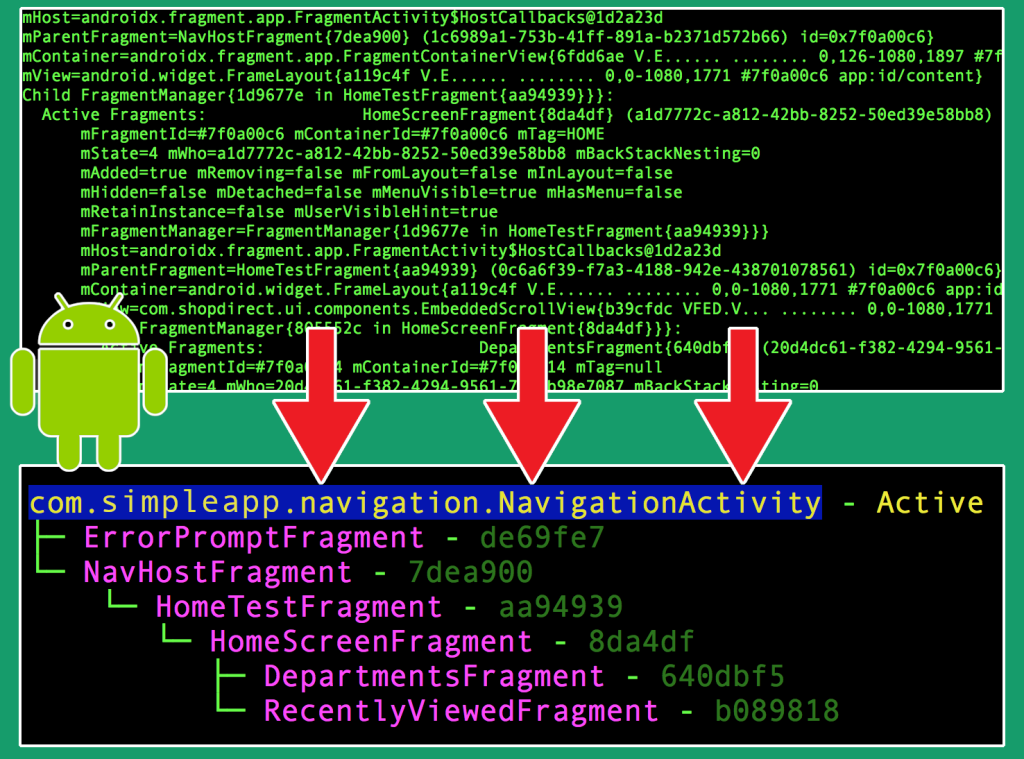 https://github.com/Kardelio/easy-dumpsys/blob/master/eds.png
Here are some other notable dumpsys services:
- dumpsys batteryinfo provides information about battery consumption by individual applications. It can be useful for monitoring and optimizing energy usage in your application.
- dumpsys meminfo provides information about memory usage by applications. You can find detailed memory usage data, allocated objects, etc.
- dumpsys network provides information about network usage by applications. You can find statistics on data sent and received by individual applications as well as network connection information.
Inspecting program bugs
From time to time it's crucial for Android developers to investigate app bugs. Apart from cloud logging solutions such as Firebase and Sentry, which collect elementary stack traces from various devices, there is also an option to generate more detailed bug reports from the device where the bug happens.
To generate a bug report for a connected device, use the following command:
adb bugreportThe main advantages of using the adb bugreport command:
- Detailed System Information generates a comprehensive report that includes detailed information about the device, system logs, event logs, running processes, battery usage, network status, and more. This information is helpful for diagnosing and troubleshooting complex system-level issues.
- Reproducible Bug Reports captures the state of the device, system logs, and other relevant information at the time the bugreport command is being executed.
- Easier collaboration The generated bug report can be shared directly with your development team, enabling effective communication and collaboration in identifying and resolving software defects.
- Analysis of a native C/C++ code report that includes tombstone files. A tombstone is a file generated when a C++ crash occurs in an Android application. It contains information for debugging the crash, including stack traces, memory maps, and open file descriptors of the crashing process. More about tombstone files: Debugging Native Android Platform Code
For more information about bug report, visit: https://developer.android.com/studio/debug/bug-report
Interact with Android application
Adb also allows you to interact with your Android application including actions such as:
- Installing and uninstalling applications
- Launching activities
- Simulating events, e.g. text typing, clicking
- Managing app permissions
Managing app installation
In addition to the typical process of running your application using Android Studio and clicking the Run app button, it's good to at least be aware of how your application is installed on your device. The benefits of using adb commands are:
- Efficient app installation: You can quickly install Android applications on your devices without relying on the Android studio interface, which sometimes can't be easily accessible on a machine
- Automations: adb commands can be incorporated into your scripts or automation tools to perform batch operations on multiple devices, e.g it can be useful for CI workflows
- Troubleshooting: In case of any running errors, you are able to identify and address potential problems and see more detailed error messages from CLI
App run consists of 3 main steps:
- Generate an .apk file from your source code; for that step, the gradle library is used. It's a build system used for Android development that handles compiling the source code, managing dependencies, and, in this case, generating an .apk file. For the easy build of your project, every Android source code consists of a gradle wrapper that allows for reproducible builds across different development environments by ensuring the use of a specific version of Gradle.
To run any gradle wrapper task, use the following command:
gradlew <task_name>In case of building a debug version of APK, it will be:
gradlew assembleDebugThis line creates an .apk file in the project directory:
<project_name/module_name/build/outputs/apk/>
- The next step is to install the application via the adb command. For that purpose the adb install command is used, which takes one parameter of the path to your previously generated .apk file.
adb install <path/to/app.apk>- Finally, we need to launch a specific activity using the activity manger
adb shell am start -n <package_name>/.<activity_name>where the -n flag indicates the component name (package name and activity separated by a slash).
In a similar manner, you can uninstall your application by passing the package name of your app:
adb uninstall <package_name>You can obtain your package name either from the AndroidManifest.xml file or with the help of adb using the pm (package manager) command:
adb shell pm list packageswhich prints package names for all applications installed on your phone.
Managing app data and permissions
The package manager also allows you to clear the data and cache associated with a package with one simple command:
adb shell pm clear <package_name>It's especially useful when you need to test the app again with a clear application state.
Another package manager advantage is the ability to grant or revoke runtime permissions for a given package.
Granting a new permission:
adb shell pm grant <package_name> <permission>Revoking a permission:
adb shell pm revoke <package_name> <permission>For example, to grant the android.permission.CAMERA permission to an app with the package name com.example.myapp, you should use the following command:
adb shell pm grant com.example.myapp android.permission.CAMERAIt's worth mentioning that you are also able to install an .apk file with all runtime permissions granted using the -g flag:
adb install -g <path/to/app.apk>Simulate user interactions
As Android developers, when developing new UI features, we sometimes need to perform the same task over and over again to check the final result, e.g. by filling in the same form to check user registration. Adb can also help us with such scenarios and provides a powerful set of shell commands that allow developers to manage events such as clicking, typing, or swiping, and many more.
Clicking
With ADB, you can simulate a tap or a click event of specific screen coordinates. By using the input tap x y command:
adb shell input tap x ywhere x and y represent the coordinates, you can trigger clicks programmatically.
adb shell input tap 250 150For identifying component positions, you can use the previously mentioned dump script with the -c flag, which prints center positions for all view components in the current view hierarchy:
dump -cOptionally, you can identify the component position in a more manual way, using the Pointer location option enabled in the developer options.
Typing
Simulating text input on an Android device is equally important. Adb provides the "input text" command, which allows you to enter text directly from the command line. By using "input text," you can emulate typing, enabling automation of form filling or text input scenarios.
adb shell input text <string>For example, typing the word Android in text input:
adb shell input text "Android"Key events
Key events are events triggered by physical or virtual keys on an Android device. These events represent user interactions with the device's hardware or software keyboard.
Android provides a set of predefined keycodes that represent different keys on a standard Android device. Some common keycodes include:
- KEYCODE_BACK: Represents the Back button.
- KEYCODE_HOME: Represents the Home button.
- KEYCODE_MENU: Represents the Menu button.
A list of all defined key events can be found here: https://developer.android.com/reference/android/view/KeyEvent
To simulate a key event interaction, provide either a key code or key name:
adb shell input keyevent <key_code or key_name>E.g to simulate clicking the Back button, type:
adb shell input keyevent KEYCODE_BACKThere are also swipe, drag and drop, key combination options, and more; to check all available options, use the command:
adb shell input -hScrcpy
One of the libraries which are built on the top of adb is scrcpy.
It is a powerful and efficient open-source tool that allows you to mirror and control your Android device's screen from your computer.
One of the most powerful features of scrcpy is screen mirroring. It enables you to mirror your Android device's screen onto your computer. This can be useful for various purposes, such as giving presentations, demonstrating apps, recording videos, or simply handling all the device actions on your computer screen at higher resolutions.
For screen mirroring, use the basic form of the command:
scrcpyIn case of many devices attached, use the -s flag, which provides a serial number of the mirrored device.
You can also add additional parameters and, e.g., set parameters such as:
--max-size
--bit-rate
--record file.mp4: Enables screen recording and saves the output to the specified file. This flag allows you to record the mirrored screen of your Android device on your computer. Specify the desired file name with the .mp4 extension. It has no max recording limitation like the screenrecord utility mentioned earlier. Moreover, you can add --no-display to only record the screen without screen mirroring.
--show-touches: Displays touch events as circles on the mirrored screen. This flag is useful for visualizing touch interactions during demonstrations or presentations.
--stay-awake: Prevents the Android device from entering sleep mode while it is connected and being mirrored. This flag ensures that the device remains active during extended mirroring sessions.
--no-control: Disables the ability to control the Android device from the computer. This flag is useful when you only want to mirror the screen without interacting with the device.
To review all commands, type:
scrcpy -hI also recommend that you get familiar with the scrpcy documentation: https://github.com/Genymobile/scrcpy#user-documentation
Summary
Adb is a powerful tool that provides a range of various commands that enable developers to interact with Android devices. It provides developers with a comprehensive set of tools for debugging, testing, and automating tasks on Android devices. Now, after having explored the basic commands and general mechanics, you can delve into the adb world and write the first aliases or scripts to improve your daily workflow.
For more inspiration, visit the following pages:
